
Customizable Whakamarie Top – Free Knit Pattern for Flat or In-the-Round
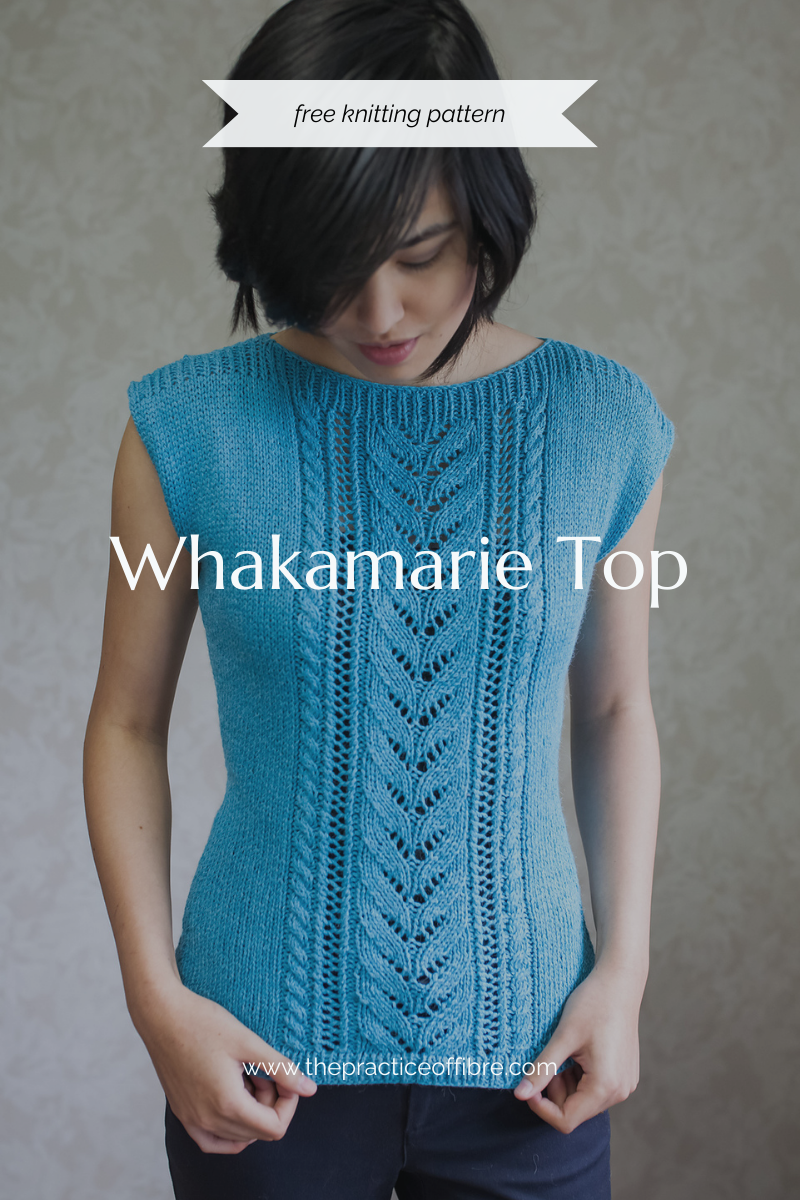
Whakamarie (meaning "peaceful" in Te Reo Māori) is a garment meant to be cherished, wear after wear.. The front panel weaves lace and cables into delicate texture, while the clean stockinette body creates a canvas for the details to shine. From the picked-up ribbing to the lace-cable hybrid panel, this is slow fashion at its most satisfying!
Designed for Movement & Ease
Tailored fit through the hips (negative to no ease for structure)
Generous 4" bust ease for unrestricted comfort
I-cord armhole finishing for polished edges that lie flat
Knit Your Way
Choose your adventure:
Flat knitting for a sturdier construction and longevity
In-the-round for seamless, portable knitting
Custom length adjustments to suit your silhouette
✨ Ready to knit something beautiful and satisfying?
🌟 Get the Free Pattern: Scroll down to access the full free knitting pattern now.
🧶 Want a Printable Version? Download the ad-free PDF by subscribing to my newsletter. It’s the perfect option for on-the-go knitting or a mindful project to savour.
Navigation
Jump to: Pattern Information | Pattern Instructions : Flat Construction
In-The-Round Construction | Modifications | Stitch Patterns & Charts
Click or tap the orange arrow to jump back to the top of the page.


Pattern Information
Needle
US 9 (5.5mm) and 8 (5.0mm) or size to obtain gauge, 24 in. (60cm) or 32 in. (80cm) circular needle.
Circular needle is recommended to accommodate large number of sts.
Yarns Used
Circus Tonic Handmade, Revelry Sock (Fingering / 4 ply ; 409 yards / 100 grams ; Merino / Nylon).
Worsted/10 ply Berroco Maya (85% Cotton, 15% Alpaca; 137 yards/50 grams).
Substitution info: use a cotton or a cotton-blend for this garment. While animal based fibers work equally as well, cotton allows for better breathability and staying cool during the summer, which this garment is intended for.
Yardage
400 - 640 yards. Yardage is dependent on gauge and amount of chart repeats worked.
Gauge
20 sts and 28 rows per 4 in./10cm in St. st. in larger needle and after blocking.
Other Notions
Cable needle
Stitch markers
Stitch holders
Row counter
Tapestry needle
Extra set of circulars for three needle bind- off.
Final Measurements
Final Measurements (bust): 32 [36, 40, 44, 48, 52, 56, 60, 64, 68, 72] in. /80[90, 100, 110, 120, 130, 140,
150, 160, 170, 180] cm.
Model is wearing size S with 4 in. / 10cm of positive ease.
Click HERE for the schematic
Abbreviations
CO - Cast on
BO - Bind off
k - knit
p - purl
k2tog- knit two togetherr
ssk - slip slip knit
p2tog - purl two together
ssp - slip slip purl
yo - yarn over
st. st. - stocking stitch
st(s) - stitch(es)
RC - slip first three stitches to cable needle, hold in
back, k3 sts then k3 sts from needle
LC - slip first three stitches to cable needle, hold in
front, k3 sts then k3 sts from needle
*LI-R - lifted increase right leaning
LI-L - lifted increase left leaning
LI-Rp - purl lifted increase right leaning
LI-Lp - purl lifted increase left leaning
You can substitute lifted increases for make 1
increases.
Pattern Instructions - Flat Construction
BACK
Using larger needles, CO 77 [87, 97, 107, 117, 127, 137, 147, 157, 177, 187].
All RS rows: K all stitches.
All WS rows: K1, p until last st, k1.
Decrease section: Work a decrease row every 4th row 7 [7, 5, 3, 3, 1, 1, 1, 1, 3, 4] times and then every 5th row 0 [0, 2, 4, 4, 6, 6, 6, 6, 0, 0] times, then every 2nd row 0 [0, 0, 0, 0, 0, 0, 0, 0, 13, 12].
Decrease row instructions:
On a RS row: K2, ssk, work pattern until last 4 sts, k2tog, k2.
On a WS row: K1, p1, p2tog, work pattern until last 4 sts, ssp, p1, k1.
You will have 63 [73, 83, 93,103, 113, 123, 133, 143, 145, 155] sts. Work for 18 rows (2.5 inches / 6.5 cm) straight for all sizes.
Increase section: Work an increase row every 3rd row 6 [6, 4, 2, 0, 0, 0, 0, 2, 14, 6] times, every 4th row 4 [4, 6, 8, 10, 8, 10, 10, 8, 0, 8] times, every 5th row 0 [0, 0, 0, 0, 2, 0, 0, 0, 0, 0] times.
Increase row instructions:
On a RS row: K2, LI-R, work pattern until last 2 sts, LI-L, k2.
On a WS row: K1, p1, LI-Lp, work pattern until last 2 sts, LI-Rp, p1, k1.
You will have 83 [93, 103, 113, 123, 133, 143, 153, 163, 173, 183] sts.
Work for 46 [48, 52, 54, 56, 60, 64, 68, 72, 76, 80] rows (6.5 [7, 7.5, 7.5, 8, 8.5, 9, 9.5, 10.5, 11, 11.5] in. / 16.5 [17.5, 19, 19, 20, 21.5, 22.5, 24, 26.5, 27.5, 29] cm) straight.
Work Top Ribbing [Rows 1-2] 4 times (1 in./2.5 cm).
Cut yarn, leaving a 12 in. tail for the three needle BO.
Slip the first 20 [23, 25, 29, 33, 36, 41, 45, 50, 55, 59] sts onto a stitch holder. Using a new strand of yarn, BO center 43 [47, 53, 55, 57, 61, 61, 63, 63, 63, 65] sts, then slip last 20 [23, 25, 29, 33, 36, 41, 45, 50, 55, 59] onto another stitch holder.
FRONT
You will work the front side in the same manner as the back side, except with the Center Panel motif.
On the first row, k17[22, 27, 32, 37, 42, 47, 52, 57, 67, 72], pm, work Center Panel, pm, k until end.
FINISHING
When both the front and back pieces have been completed, hold both sides together with WS facing. Starting with the right shoulder sts, slip them onto needles and BO them off together using the three needle bind off. Cut yarn. Repeat with the left shoulder sts.
Block garment to measurements on schematic and lay flat to dry.
Seam up the sides using mattress stitch, using the garter stitch edges to help keep in line. Stop at 6.5 [7, 7.5, 7.5, 8, 8.5, 9, 9.5, 10.5, 11, 11.5] in. / 16.5 [17.5, 19, 19, 20.21.5, 22.5, 24, 26.5, 27.5, 29] cm from the top for the armholes.
Using size 8 needle, pick up four stitches for every five rows around the armholes and work I-Cord edging. BO and seam the ends together.
Using size 8 needle, pick up stitches one for one around the bottom hem, making sure you pick up an even number of stitches in the end.
Work *k1, p1* rib for 1 in. / 2.5 cm. BO loosely, cut yarn then weave in ends.
Pattern Instructions - Round Construction
Using smaller needle, CO 150[170, 190, 210, 230, 250, 270, 290, 310, 350, 370] sts.
PM (this is the BOR marker) and join in the round.
Work *k1, p1* ribbing for 8 rnds.
MAIN BODY
Switch to larger needle. On the first rnd, k16[21, 26, 31, 36, 41, 46, 51, 56, 66, 71], pm, work Center Panel Motif, pm, k16[21, 26, 31, 36, 41, 46, 51, 56, 66, 71], pm, k until end of rnd. There will be four markers.
Decrease Section: Work a decrease rnd every 4th row 7[7, 5, 3, 3, 1, 1, 1, 1, 3, 4] times and then every 5th row 0[0, 2, 4, 4, 6, 6, 6, 6, 0, 0] times, then every 2nd row 0[0, 0, 0, 0, 0, 0, 0, 0, 13, 12].
Decrease Rnd Instructions: K2, ssk, work pattern until last 4 sts before third marker, k2tog, k2, sm, k2, ssk, k until last four sts, k2tog, k2. You will have 122[142, 162, 182, 202, 222, 242, 262, 282, 286, 306] sts. Work for 18 rows (2.5 in. / 6.5 cm) straight for all sizes.
Increase Section: Work an increase rnd every 3rd row 6[6, 4, 2, 0, 0, 0, 0, 2, 14, 6] times, every 4th row 4[4, 6, 8, 10, 8, 10, 10, 8, 0, 8] times, every 5th row 0[0, 0, 0, 0, 2, 0, 0, 0, 0, 0] times.
Increase Rnd Instructions: K2, LI-R, work pattern until last 2 sts before third marker, LI-L, k2, sm, k2, LI-R, k until last 2 sts, LI-L, k2. You will have 162[182, 202, 222, 242, 262282, 302, 322, 342, 362] sts. Work for 8 rnds (1 in. / 2.5 cm) straight.
SEPARATE FOR ARMHOLES
You will working the front and back separately back and forth in rows. Follow the instructions for the flat version of the Center Panel Motif.
Work each side straight for 38[40, 44, 46,48, 52, 56, 60, 64, 68, 7] rows (5.5[5.75, 6.25, 6.5, 6.75, 7.5, 8, 8.5, 9.25, 9.75, 10.25] inches / 14[14.5, 15.5, 16.5, 17, 19, 20, 21.5, 23, 24.5, 25.5] cm). When working the WS rows, K the first and last stitch. Remove the BOR and third marker.
After working these rows, work top ribbing [Rows 1- 2] 4 times (one inch / 2.5 cm).
Cut yarn, leaving a 12 inch tail for the three needle BO. Slip the first 19[22, 24, 28, 32, 35, 40, 44, 49, 54, 58] sts onto a stitch holder. Using a new strand of yarn, BO center 43[47, 53, 55, 57,61, 61, 63, 63, 63, 65] sts, then slip last 19[22, 24, 28, 32, 35, 40, 44, 49, 54, 58] onto another stitch holder.
FINISHING
When both the front and back pieces have been completed, turn garment inside out so that WS is facing out. Starting with the right shoulder sts, slip them onto needles and BO them off together using the three needle bind off. Cut yarn. Repeat with the left shoulder sts.
Using size 8 needle, pick up four stitches for every five rows around the armholes and work I-Cord edging. BO and seam the ends together. Block garment to measurements on schematic on page 7 and lay flat to dry.
Modifications
ADDING LENGTH
If you wish to add two inches to the total length of the top, having it fall closer to the full hip you will need to begin with a larger CO and extra decrease rows/rnds.
Hip measurements: 34[38, 42, 46, 50, 54, 58, 62, 66, 74, 78] inches / 85[95, 105, 115, 125, 135, 145, 155, 165, 185, 195] cm
Total Length: 22[22.5, 23.5, 24, 24.75, 26, 26, 26.5, 27, 28, 30] inches / 55[56.5, 59, 60, 62, 65, 66.5, 67.5, 70, 75] cm
FLAT INSTRUCTIONS
CO 87[97, 107, 117, 127, 137, 147, 157, 167, 187, 197] sts Place markers at k22[27, 32, 37, 42, 47, 52, 57, 62, 72, 77] and after the center panel
IN THE RND INSTRUCTIONS
CO 170[190, 210, 230, 250, 270, 290, 310, 330, 370, 390] sts
Place markers at k21[26, 31, 36, 41, 46, 51, 56, 61, 71, 76], after the center panel, then after k21[26, 31, 36, 41, 46, 51, 56, 61, 71, 76].
Decrease Rows/Rnds
Every 3rd row 6[6, 4, 2, 0, 0, 0, 0, 0, 0, 0, ] times, every 4th row 6[6, 8, 10, 12, 10, 10, 10, 10, 6, 6] times, and every 5th row 0[0, 0, 0, 0, 2, 2, 2, 2, 0, 0] times, then every 2nd row 0[0, 0, 0, 0, 0, 0, 0, 0, 15, 15]
Refer to the pattern proper for how to work these decrease rows/rnds.
You will have 63[73, 83, 93,103, 113, 123, 133, 143, 145, 155] sts (flat) or 122[142, 162, 182, 202, 222, 242, 262, 282, 286, 306] sts (in the rnd).

Stitch Patterns & Charts
Top Ribbing
Row 1 (RS): K1, *k1, p1*, until last two sts, k2
Row 2 (WS): K1, *p1, k1*.
Center Panel Motif - Written Instructions
Flat Row 1 (RS): P1, k6, p1, ssk, yo, k2, p1, k3, k2tog, k3, yo, p1, yo, k3, ssk, k3, p1, ssk, yo, k2, p1, k6, p1.
Row 2 and all WS rows: K1, p6, k1, p2tog, yo, p2, (k1, p8) x 2, k1, p2tog, yo, p2, k1, p6, k1
Row 3: P1, 3/3 RC, p1, ssk, yo, k2, p1, k2, k2tog, k3, yo, k1, p1, k1, yo, k3, ssk, k2, p1, ssk, yo, k2, p1, 3/3 LC, p1.
Row 5: P1, k6, p1, ssk, yo, k2, p1, k1, k2tog, k3, yo, k2, p1, k2, yo, k3, ssk, k1, p1, ssk, yo, k2, p1, k6, p1.
Row 7: P1, 3/3 RC, p1, ssk, yo, k2, p1, k2tog, k3, yo, k3, p1, k3, yo, k3, ssk, p1, ssk, yo, k2, p1, 3/3 LC, p1.


Center Panel Motif - Written Instructions in the Round
Rnd 1: P1, k6, p1, ssk, yo, k2, p1, k3, k2tog, k3, yo, p1, yo, k3, ssk, k3, p1, ssk, yo, k2, p1, k6, p1.
Rnds 2, 4, 6 and 8: P1, k6, p1, k2, yo, k2tog, p1, k8, p1, k8, p1, k2, yo, k2tog, p1, k6, p1 .
Rnd 3: P1, 3/3 RC, p1, ssk, yo, k2, p1, k2, k2tog, k3, yo, k1, p1, k1, yo, k3, ssk, k2, p1, ssk, yo, k2, p1, 3/3 LC, p1.
Rnd 5: P1, k6, p1, ssk, yo, k2, p1, k1, k2tog, k3, yo, k2, p1, k2, yo, k3, ssk, k1, p1, ssk, yo, k2, p1, k6, p1.
Rnd 7: P1, 3/3 RC, p1, ssk, yo, k2, p1, k2tog, k3, yo, k3, p1, k3, yo, k3, ssk, p1, ssk, yo, k2, p1, 3/3 LC, p1.
Thank you!
If you enjoyed knitting this pattern, please consider leaving me a tip!