
Your New Wardrobe Staple: The Koru Cardigan (Free Pattern!)

The koru is a fundamental symbol in Māori art, derived from the unfurling shape of a silver fern frond. It represents new life, growth, and the unfolding of our own potential. Its inward coil speaks to a return to our origins, while its continuous movement suggests the ongoing journey of the self.
I was knitting the first samples of this cardigan in 2016 when my home in Kumamoto, Japan, was struck by a series of major earthquakes. In the disorienting aftermath, this project became my anchor. The methodical rhythm of shaping the pieces—row by row, stitch by stitch—became a quiet, determined act of rebuilding. It was a practice in moving forward, much like the koru itself, which doesn't wait for perfect conditions to unfurl.
This cardigan is my offering to you. May it be more than just a garment; may it be a steadying, tangible practice for your own hands and heart during times of change, growth, or quiet rebuilding.

Koru Cardigan © 2025 by Françoise Danoy
is licensed under CC BY-SA 4.0
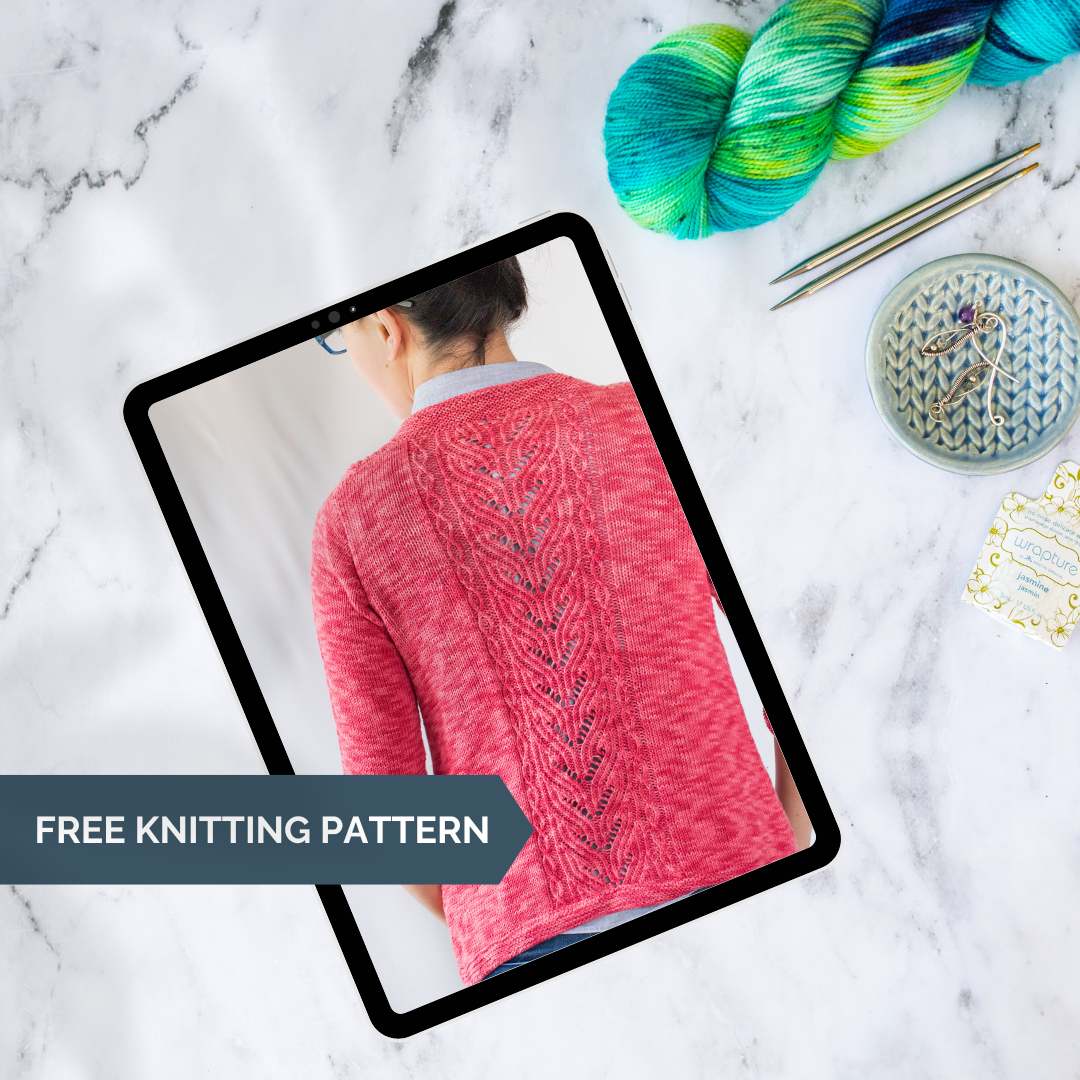
✨ Ready to knit something beautiful and satisfying?
🌟 Get the Free Pattern: Scroll down to access the full free knitting pattern now.
🧶 Want a Printable Version? Download the ad-free PDF by subscribing to my newsletter. It’s the perfect option for on-the-go knitting or a mindful project to savour.
Navigation
Jump to: Pattern Information | Stitch Patterns & Charts | Techniques & Tutorials
Pattern Instructions: Right Panel | Back Panel | Sleeves
Click or tap the orange arrow to jump back to the top of the page.


Pattern Information
YARN
Weight: Fingering / 4-ply
Yarn Used: Scheepjes Sunkissed
Fiber: 100% Cotton
Meterage: 170 m / 50 g
NEEDLES
Recommended: US 5 (3.75 mm)
Note: Adjust needle size as needed to obtain correct gauge.
GAUGE
24 sts and 28 rows = 4 in. / 10 cm in Stockinette stitch (knit flat or in the round) using US 5 (3.75 mm) needles, after blocking.
Note: Gauge is crucial for proper fit.
NOTIONS
Stitch markers
Waste yarn or stitch holders
Tapestry needle
Third needle (for three-needle bind-off)
SIZING & YARDAGE
Finished Garment Measurements:
To fit bust sizes: 32 (36, 40, 44, 48, 52) [56, 60, 64, 68] in. / 80 (90, 100, 110, 120, 130) [140, 150, 160, 170] cm
Yarn Requirements:
Size 32": 850 yards (777 meters)
Size 36": 1020 yards (932 meters)
Size 40": 1020 yards (932 meters)
Size 44": 1190 yards (1088 meters)
Size 48": 1190 yards (1088 meters)
Size 52": 1360 yards (1243 meters)
Size 56": 1360 yards (1243 meters)
Size 60": 1530 yards (1400 meters)
Size 64": 1530 yards (1400 meters)
Size 68": 1700 yards (1554 meters)
Abbreviations
Basic Stitches
K: Knit
P: Purl
K tbl: Knit through the back loop
P tbl: Purl through the back loop
Increases & Decreases
K2tog: Knit 2 stitches together (right-leaning decrease)
Ssk: Slip, slip, knit (left-leaning decrease)
Yo: Yarn over
Special Techniques
Sl pwise wyib: Slip 1 stitch purlwise with yarn in back
Sl kwise wyif: Slip 1 stitch knitwise with yarn in front
Cable Stitches (using a cable needle)
1/1 RT: Slip 1 to cn, hold in back, k1, k1 from cn
1/1 LT: Slip 1 to cn, hold in front, k1, k1 from cn
1/1 RPT: Slip 1 to cn, hold in back, k1 tbl, p1 from cn
1/1 LPT: Slip 1 to cn, hold in front, p1, k1 tbl from cn
General
CO: Cast on
BO: Bind off
Pm: Place marker
Sm: Slip marker
M: Marker

PATTERN INSTRUCTIONS
Construction
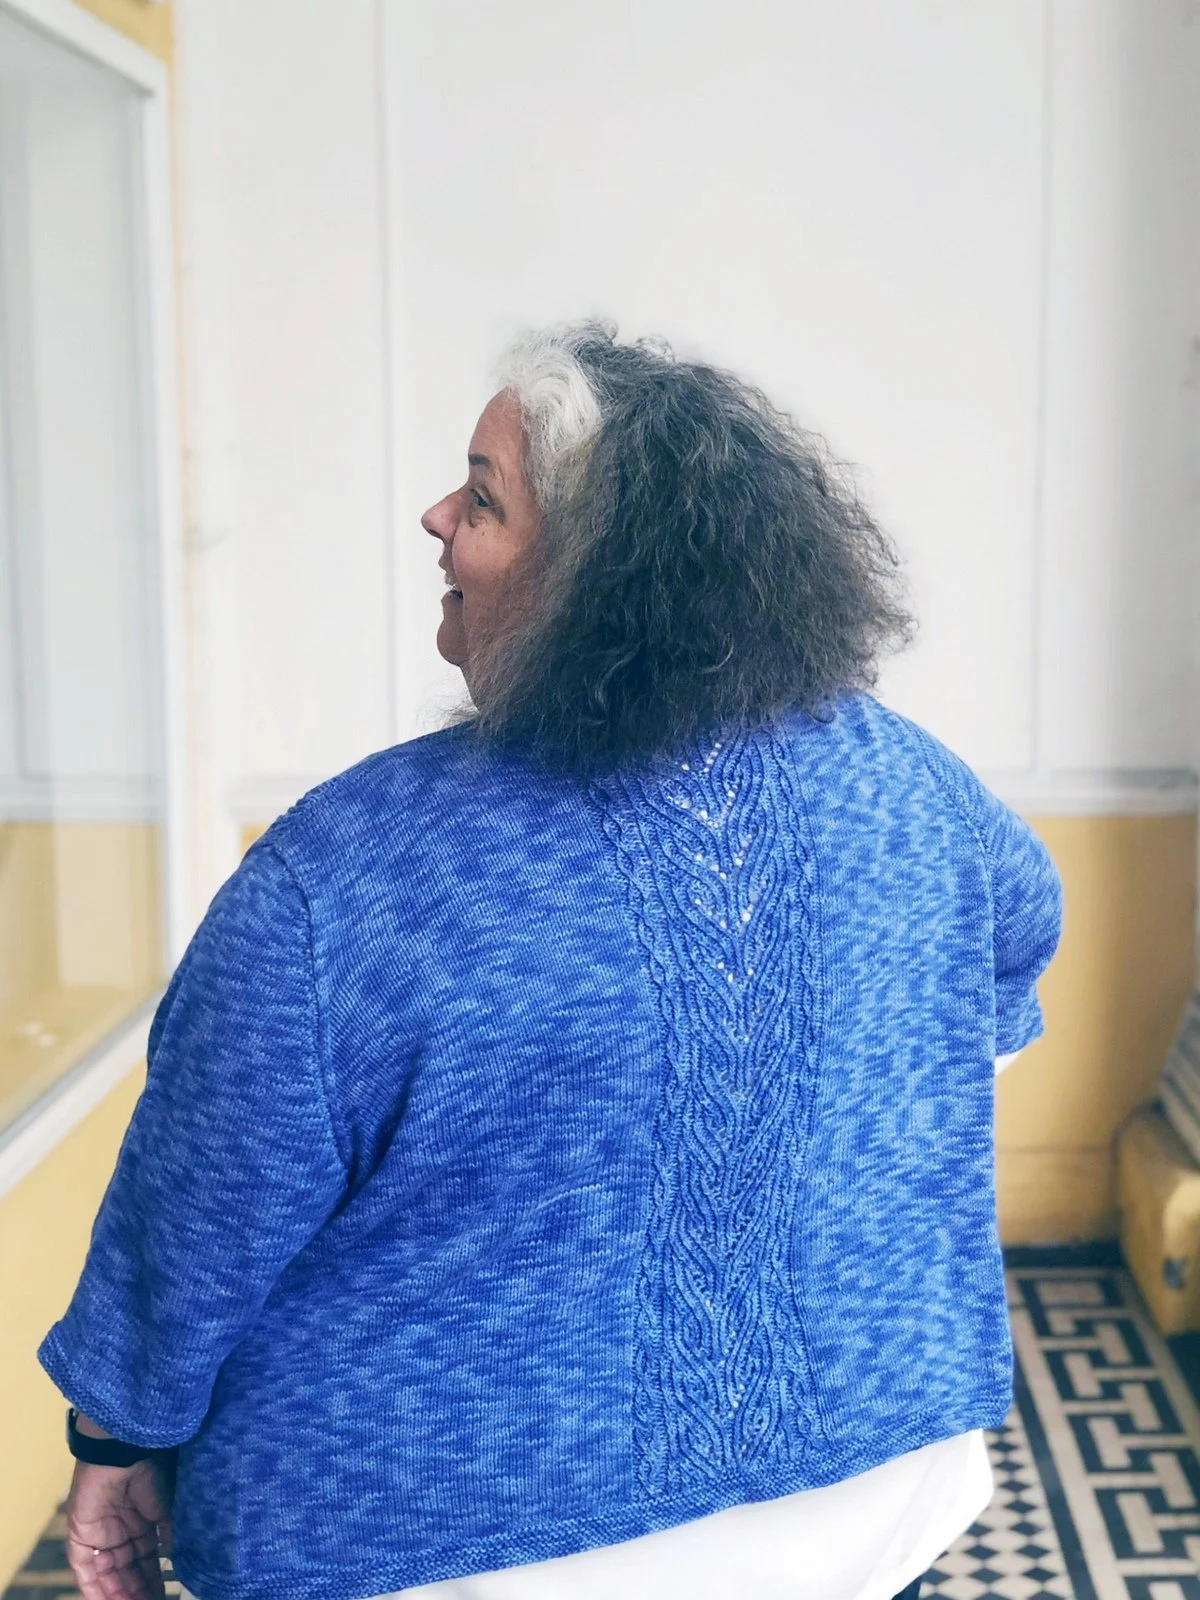
This cardigan is worked flat from the bottom up in separate pieces. The front and back pieces are seamed at the sides using the mattress stitch and at the shoulders using the three-needle bind-off.
Sleeves are worked top-down by picking up stitches around the armhole. Short rows are used to shape the sleeve cap for a better fit. The front bands and bottom band are worked last by picking up stitches along the cardigan edges and knitting flat.
LEFT PANEL
Cast On & Set-Up
CO 60 (66, 72, 76, 84, 90) [96, 102, 114, 120] sts.
Set-Up Row (WS): Sl1 pwise wyif, p22 (24, 27, 29, 34, 37) [40, 43, 49, 52], pm, p13, pm, p24 (28, 31, 33, 36, 39) [42, 45, 51, 54].
Note: This set-up row is not counted in the final row count.
Body Shaping
Work the body in stockinette stitch, maintaining the established stitch patterns and working decreases as specified.
Established Rows:
Row 1 (RS): Sl1 kwise wyib, k to m, sm, work Left Koru pattern (starting Row 1), sm, k to end.
Row 2 (WS): Sl1 pwise wyif, p to m, sm, work Left Koru pattern, sm, p to end.
Decrease Rows:
Dec. Row (RS): Sl1 kwise wyib, k1, ssk, k to m, sm, work Left Koru pattern, sm, k to end.
Dec. Row (WS): Sl1 pwise wyif, p to m, sm, work Left Koru pattern, sm, p to last 3 sts, p2tog tbl, p1.
Follow the row and stitch count for your specific size to ensure proper shaping.
Size 32"
Row 11: 59 sts
Row 22: 58 sts
Row 33: 57 sts
Row 44: 56 sts
Row 55: 55 sts
Row 66: 54 sts
Row 77: 53 sts
Row 88: 52 sts
Row 99: 51 sts
Size 36"
Row 12: 65 sts
Row 24: 64 sts
Row 36: 63 sts
Row 48: 62 sts
Row 60: 61 sts
Row 72: 60 sts
Row 84: 59 sts
Row 96: 58 sts
Row 108: 57 sts
Size 40"
Row 12: 71 sts
Row 24: 70 sts
Row 36: 69 sts
Row 48: 68 sts
Row 60: 67 sts
Row 72: 66 sts
Row 84: 65 sts
Row 96: 64 sts
Row 108: 63 sts
Size 44"
Row 16: 75 sts
Row 32: 74 sts
Row 48: 73 sts
Row 64: 72 sts
Row 80: 71 sts
Row 96: 70 sts
Row 112: 69 sts
Size 48"
Row 12: 83 sts
Row 24: 82 sts
Row 36: 81 sts
Row 48: 80 sts
Row 60: 79 sts
Row 72: 78 sts
Row 84: 77 sts
Row 96: 76 sts
Row 108: 75 sts
Size 52"
Row 12: 89 sts
Row 24: 88 sts
Row 36: 87 sts
Row 48: 86 sts
Row 60: 85 sts
Row 72: 84 sts
Row 84: 83 sts
Row 96: 82 sts
Row 108: 81 sts
Size 56"
Row 12: 95 sts
Row 24: 94 sts
Row 36: 93 sts
Row 48: 92 sts
Row 60: 91 sts
Row 72: 90 sts
Row 84: 89 sts
Row 96: 88 sts
Row 108: 87 sts
Size 60"
Row 12: 101 sts
Row 24: 100 sts
Row 36: 99 sts
Row 48: 98 sts
Row 60: 97 sts
Row 72: 96 sts
Row 84: 95 sts
Row 96: 94 sts
Row 108: 93 sts
Size 64"
Row 7: 113 sts
Row 14: 112 sts
Row 21: 111 sts
Row 28: 110 sts
Row 35: 109 sts
Row 42: 108 sts
Row 49: 107 sts
Row 56: 106 sts
Row 63: 105 sts
Row 70: 104 sts
Row 77: 103 sts
Row 84: 102 sts
Row 91: 101 sts
Row 98: 100 sts
Row 105: 99 sts
Size 68"
Row 8: 119 sts
Row 16: 118 sts
Row 24: 117 sts
Row 32: 116 sts
Row 40: 115 sts
Row 48: 114 sts
Row 56: 113 sts
Row 64: 112 sts
Row 72: 111 sts
Row 80: 110 sts
Row 88: 109 sts
Row 96: 108 sts
Row 104: 107 sts
Row 112: 106 sts
Row 120: 105 sts
Work Even
After completing all shaping decreases, work Rows 1 and 2 as established for 7 (2, 4, 2, 8, 6) [4, 2, 11, 6] rows.
Total rows worked: 106 (110, 112, 114, 116, 114) [112, 110, 116, 126] rows.


SHAPING THE LEFT ARMHOLE
You will now shape the armhole (left edge) and collar (right edge) simultaneously, sometimes on the same row. The process is as follows:
Armhole Bind-Off: First, complete the bind-off rows for the armhole as written in the following section.
Continue in Pattern: After the bind-offs, work the established straight RS and WS rows until the next shaping row.
Follow the Shaping Table: For all subsequent shaping, follow the "Left and Right Panels Armhole and Collar Decreases" table.
Working the Decreases:
On a decrease row, work the specified shaping at the armhole edge (beginning of RS rows) and/or the collar edge (end of RS rows).
When a decrease row requires shaping on both edges, the pattern instruction will contain a bracketed section
[ ... ]. Substitute this entire bracketed section by working the two required decreases—one for the armhole and one for the collar—at their respective ends of the row.
Bind-Off Rows:
BO Row 1 (RS): BO 6 (8, 10, 11, 12, 13) [15, 16, 17, 18] sts, k9 (11, 12, 15, 15, 17) [18, 20, 19, 21], sm, work Left Koru pattern, sm, k23 (25, 28, 30, 35, 38) [41, 44, 50, 53].
[45 (49, 53, 58, 63, 68) [72, 77, 82, 87] sts remain]BO Row 2 (WS): Sl1 pwise wyif, p to m, sm, work Left Koru pattern, sm, p to end.
Collar Decrease Rows:
RS: Sl1 kwise wyib, k to m, sm, work Left Koru pattern, sm, k to last 4 sts, k2tog, k2.
WS: Sl1 pwise wyif, p1, p2tog, p to m, sm, work Left Koru pattern, sm, p to end.
Armhole Decrease Rows:
RS: Sl1 kwise wyib, k1, ssk, k to m, sm, work Left Koru pattern, sm, k to end.
Left and Right Panels Armhole and Collar Decreases
Work the collar decreases as specified for your size. Track your progress by counting completed armhole shaping rows and checking the corresponding collar stitch count.
Size 32"
Row 3: 8 sts
Row 7: 7 sts
Row 11: 6 sts
Row 15: 5 sts
Row 19: 4 sts
Size 36"
Row 3: 22 sts
Row 6: 21 sts
Row 9: 20 sts
Row 12: 19 sts
Row 15: 18 sts
Row 18: 17 sts
Row 21: 16 sts
Row 24: 15 sts
Row 27: 14 sts
Row 30: 13 sts
Row 33: 12 sts
Row 36: 11 sts
Row 39: 10 sts
Row 42: 9 sts
Row 45: 8 sts
Row 48: 7 sts
Row 51: 6 sts
Size 40"
Row 3: 10 sts
Row 6: 9 sts
Row 9: 8 sts
Row 12: 7 sts
Row 15: 6 sts
Row 18: 5 sts
Row 21: 4 sts
Size 44"
Row 3: 24 sts
Row 6: 23 sts
Row 9: 22 sts
Row 12: 21 sts
Row 15: 20 sts
Row 18: 19 sts
Row 21: 18 sts
Row 24: 17 sts
Row 27: 16 sts
Row 30: 15 sts
Row 33: 14 sts
Row 36: 13 sts
Row 39: 12 sts
Row 42: 11 sts
Row 45: 10 sts
Row 48: 9 sts
Row 51: 8 sts
Row 54: 7 sts
Row 57: 6 sts
Size 48"
Row 3: 11 sts
Row 6: 10 sts
Row 9: 9 sts
Row 12: 8 sts
Row 15: 7 sts
Row 18: 6 sts
Row 21: 5 sts
Row 24: 4 sts
Size 52"
Row 3: 27 sts
Row 6: 26 sts
Row 9: 25 sts
Row 12: 24 sts
Row 15: 23 sts
Row 18: 22 sts
Row 21: 21 sts
Row 24: 20 sts
Row 27: 19 sts
Row 30: 18 sts
Row 33: 17 sts
Row 36: 16 sts
Row 39: 15 sts
Row 42: 14 sts
Row 45: 13 sts
Row 48: 12 sts
Row 51: 11 sts
Row 54: 10 sts
Row 57: 9 sts
Row 60: 8 sts
Row 63: 7 sts
Row 66: 6 sts
Size 56"
Row 3: 14 sts
Row 6: 13 sts
Row 9: 12 sts
Row 12: 11 sts
Row 15: 10 sts
Row 18: 9 sts
Row 21: 8 sts
Row 24: 7 sts
Row 27: 6 sts
Row 30: 5 sts
Row 33: 4 sts
Size 60"
Row 3: 29 sts
Row 6: 28 sts
Row 9: 27 sts
Row 12: 26 sts
Row 15: 25 sts
Row 18: 24 sts
Row 21: 23 sts
Row 24: 22 sts
Row 27: 21 sts
Row 30: 20 sts
Row 33: 19 sts
Row 36: 18 sts
Row 39: 17 sts
Row 42: 16 sts
Row 45: 15 sts
Row 48: 14 sts
Row 51: 13 sts
Row 54: 12 sts
Row 57: 11 sts
Row 60: 10 sts
Row 63: 9 sts
Row 66: 8 sts
Row 69: 7 sts
Row 72: 6 sts
Size 64"
Row 3: 16 sts
Row 6: 15 sts
Row 9: 14 sts
Row 12: 13 sts
Row 15: 12 sts
Row 18: 11 sts
Row 21: 10 sts
Row 24: 9 sts
Row 27: 8 sts
Row 30: 7 sts
Row 33: 6 sts
Row 36: 5 sts
Row 39: 4 sts
Size 68"
Row 3: 34 sts
Row 6: 33 sts
Row 9: 32 sts
Row 12: 31 sts
Row 15: 30 sts
Row 18: 29 sts
Row 21: 28 sts
Row 24: 27 sts
Row 27: 26 sts
Row 30: 25 sts
Row 33: 24 sts
Row 36: 23 sts
Row 39: 22 sts
Row 42: 21 sts
Row 45: 20 sts
Row 48: 19 sts
Row 51: 18 sts
Row 54: 17 sts
Row 57: 16 sts
Row 60: 15 sts
Row 63: 14 sts
Row 66: 13 sts
Row 69: 12 sts
Row 72: 11 sts
Row 75: 10 sts
Row 78: 9 sts
Row 81: 8 sts
Row 84: 7 sts
Row 87: 6 sts
Complete Shaping
After all shaping decreases and BOs are complete, work 1 WS row even.
Finished measurements: Piece should measure 7 (7.5, 8.25, 8.25, 9, 9.25) [9.75, 10.5, 11.25, 11.5] inches / 17.5 (19, 20.5, 20.5, 22.5, 23) [24.5, 26.5, 28, 29] cm from armhole bind-off.
Cut yarn and place stitches on holder.
RIGHT PANEL
Cast On & Set-Up
CO 60 (66, 72, 76, 84, 90) [96, 102, 114, 120] sts.
Set-Up Row (WS): Sl1 pwise wyif, p23 (27, 30, 32, 35, 38) [41, 44, 50, 53], pm, p13, pm, p23 (25, 28, 30, 35, 38) [41, 44, 50, 53].
Note: This set-up row is not counted in the final row count.
Body Shaping
Work the body in stockinette stitch, maintaining stitch patterns and working decreases as specified.
Established Rows:
RS: Sl1 kwise wyib, k to m, sm, work Right Koru pattern, sm, k to end.
WS: Sl1 pwise wyif, p to m, sm, work Right Koru pattern, sm, p to end.
Decrease Rows:
RS: Sl1 kwise wyib, k to m, sm, work Right Koru pattern, sm, k to last 4 sts, k2tog, k2.
WS: Sl1 pwise wyif, p1, p2tog, p to m, sm, work Right Koru pattern, sm, p to end.
Follow the "Left and Right Panels - Body Shaping" table for decrease frequency (above).
Work Even
After shaping, work even for 7 (2, 4, 2, 8, 6) [4, 2, 11, 6] rows.
Total rows worked: 106 (110, 112, 114, 116, 114) [112, 110, 116, 126] rows.
SHAPING THE RIGHT ARMHOLE
You will now shape the armhole (right edge) and collar (left edge) simultaneously, sometimes on the same row. The process is as follows:
Armhole Bind-Off: First, complete the bind-off rows for the armhole as written in the following section.
Continue in Pattern: After the bind-offs, work the established straight RS and WS rows until the next shaping row.
Follow the Shaping Table: For all subsequent shaping, follow the "Left and Right Panels Armhole and Collar Decreases" table.
Working the Decreases:
On a decrease row, work the specified shaping at the armhole edge (beginning of RS rows) and/or the collar edge (end of RS rows).
When a decrease row requires shaping on both edges, the pattern instruction will contain a bracketed section
[ ... ]. Substitute this entire bracketed section by working the two required decreases—one for the armhole and one for the collar—at their respective ends of the row.
Bind-Off Rows:
BO Row 1 (RS): Sl1 kwise wyif, k22 (24, 27, 29, 34, 37) [40, 43, 49, 52], sm, work Right Koru pattern, sm, k9 (11, 12, 15, 15, 17) [18, 20, 19, 21], BO 6 (8, 10, 11, 12, 13) [15, 16, 17, 18] sts.
[45 (49, 53, 58, 63, 68) [72, 77, 82, 87] sts remain]
Note: You will need to cut the yarn and rejoin for the next row.BO Row 2 (WS): Join yarn. Sl1 pwise wyif, p to m, sm, work Right Koru pattern, sm, p to end.
Collar Decrease Rows:
RS: Sl1 kwise wyif, k1, ssk, k to m, sm, work Right Koru pattern, sm, k to end.
WS: Sl1 pwise wyif, p to m, sm, work Right Koru pattern, sm, p to last 4 sts, p2tog tbl, p2.
Armhole Decrease Rows:
RS: Sl1 kwise wyif, k to m, sm, work Right Koru pattern, sm, k to last 4 sts, k2tog, k2.
Complete Shaping
After all shaping decreases are complete, work 1 WS row even.
Finished measurements: Piece should measure 7 (7.5, 8.25, 8.25, 9, 9.25) [9.75, 10.5, 11.25, 11.5] inches / 17.5 (19, 20.5, 20.5, 22.5, 23) [24.5, 26.5, 28, 29] cm from armhole bind-off.
Cut yarn and place stitches on holder.
BACK PANEL
Cast On & Set-Up
CO 119 (131, 143, 155, 167, 179) [191, 203, 227, 239] sts.
Set-Up Row (WS): Sl1 pwise wyif, p41 (47, 53, 59, 65, 71) [77, 83, 95, 101], pm, p35, pm, p42 (48, 54, 60, 66, 72) [78, 84, 96, 102].
Note: This set-up row is not counted in the final row count.
Body
Work the body in stockinette stitch, maintaining the established stitch patterns.
Established Rows:
RS Rows: Sl1 kwise wyib, k to m, sm, work Back Twists pattern, work Back Koru pattern, work Back Twists pattern, sm, k to end.
WS Rows: Sl1 pwise wyif, p to m, sm, work Back Twists pattern, work Back Koru pattern, work Back Twists pattern, sm, p to end.
Decrease Rows:
Dec. RS Row: Sl1 kwise wyib, k1, ssk, k to m, sm, work Back Twists pattern, work Back Koru pattern, work Back Twists pattern, sm, k to last 4 sts, k2tog, k2.
Dec. WS Row: Sl1 pwise wyif, p1, p2tog, p to m, sm, work Back Twists pattern, work Back Koru pattern, work Back Twists pattern, sm, p to last 4 sts, p2tog tbl, p2.
Follow the "Back Panel - Body Shaping" table for the frequency of decrease rows to maintain proper stitch counts.
Continue working these established rows until the Back Panel matches the length of the Left and Right Front Panels to the armhole, or as specified in the pattern instructions.
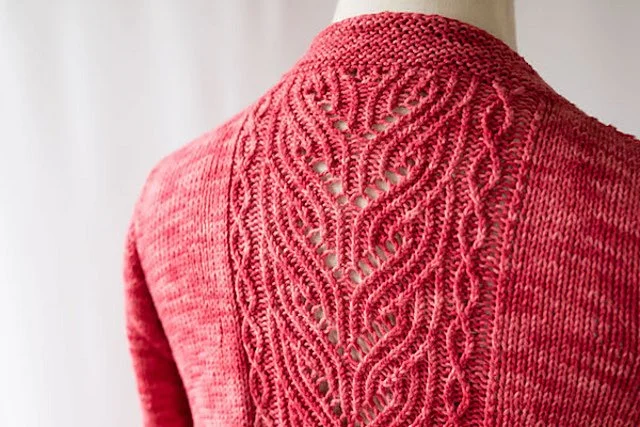
The Back Twist Side Panels and the Koru Center Panel have different repeat rhythms:
Back Twist Side Panels: 8-row repeat
Koru Center Panel: 12-row repeat
Work each panel's repeat independently. There is no need to synchronize the start or end of their repeat cycles
Back Panel - Body Shaping
Follow the row and stitch count for your specific size to ensure proper shaping.
Size 32"
Row 11: 117 sts
Row 22: 115 sts
Row 33: 113 sts
Row 44: 111 sts
Row 55: 109 sts
Row 66: 107 sts
Row 77: 105 sts
Row 88: 103 sts
Row 99: 101 sts
Size 36"
Row 12: 129 sts
Row 24: 127 sts
Row 36: 125 sts
Row 48: 123 sts
Row 60: 121 sts
Row 72: 119 sts
Row 84: 117 sts
Row 96: 115 sts
Row 108: 113 sts
Size 40"
Row 12: 141 sts
Row 24: 139 sts
Row 36: 137 sts
Row 48: 135 sts
Row 60: 133 sts
Row 72: 131 sts
Row 84: 129 sts
Row 96: 127 sts
Row 108: 125 sts
Size 44"
Row 16: 153 sts
Row 32: 151 sts
Row 48: 149 sts
Row 64: 147 sts
Row 80: 145 sts
Row 96: 143 sts
Row 112: 141 sts
Size 48"
Row 12: 165 sts
Row 24: 163 sts
Row 36: 161 sts
Row 48: 159 sts
Row 60: 157 sts
Row 72: 155 sts
Row 84: 153 sts
Row 96: 151 sts
Row 108: 149 sts
Size 52"
Row 12: 177 sts
Row 24: 175 sts
Row 36: 173 sts
Row 48: 171 sts
Row 60: 169 sts
Row 72: 167 sts
Row 84: 165 sts
Row 96: 163 sts
Row 108: 161 sts
Size 56"
Row 12: 189 sts
Row 24: 187 sts
Row 36: 185 sts
Row 48: 183 sts
Row 60: 181 sts
Row 72: 179 sts
Row 84: 177 sts
Row 96: 175 sts
Row 108: 173 sts
Size 60"
Row 12: 201 sts
Row 24: 199 sts
Row 36: 197 sts
Row 48: 195 sts
Row 60: 193 sts
Row 72: 191 sts
Row 84: 189 sts
Row 96: 187 sts
Row 108: 185 sts
Size 64"
Row 7: 225 sts
Row 14: 223 sts
Row 21: 221 sts
Row 28: 219 sts
Row 35: 217 sts
Row 42: 215 sts
Row 49: 213 sts
Row 56: 211 sts
Row 63: 209 sts
Row 70: 207 sts
Row 77: 205 sts
Row 84: 203 sts
Row 91: 201 sts
Row 98: 199 sts
Row 105: 197 sts
Size 68"
Row 8: 237 sts
Row 16: 235 sts
Row 24: 233 sts
Row 32: 231 sts
Row 40: 229 sts
Row 48: 227 sts
Row 56: 225 sts
Row 64: 223 sts
Row 72: 221 sts
Row 80: 219 sts
Row 88: 217 sts
Row 96: 215 sts
Row 104: 213 sts
Row 112: 211 sts
Row 120: 209 sts
After completing all shaping decreases, work the established rows even for 7 (2, 4, 2, 8, 6) [4, 2, 11, 6] rows.
Total rows worked: 106 (110, 112, 114, 116, 114) [112, 110, 116, 126] rows.
BACK PANEL ARMHOLE SHAPING
Shape Armholes (Bind-Off)
First, work the initial bind-off rows below to form the armholes.
Then, continue working the established straight rows, referring to the "Back Panel Armhole Decreases" table for all subsequent shaping. Work the specified decrease rows to maintain the correct stitch count.
BO Row 1 (RS): BO 6 (8, 10, 11, 12, 13) [15, 16, 17, 18] sts, k to marker, sm, work Back Twists pattern, work Back Koru pattern, work Back Twists pattern, sm, k to end.
[95 (105, 115, 130, 137, 148) [158, 169, 180, 191] sts remain]
BO Row 2 (WS): BO 6 (8, 10, 11, 12, 13) [15, 16, 17, 18] sts, p to marker, sm, work Back Twists pattern, work Back Koru pattern, work Back Twists pattern, sm, p to end.
[89 (97, 105, 119, 125, 135) [143, 153, 163, 173] sts remain]
Dec. Armhole Shaping RS Row: Sl1 kwise wyif, k1, ssk, k to m, sm, work Back Twists pattern, work Back Koru pattern, work Back Twists pattern, sm, k to last 4 sts, k2tog, k2.
(2 sts decreased)
Back Panel Armhole Decreases
Work the decreases as specified for your size. Track your progress by counting completed decrease rounds and checking the corresponding stitch count.
Size 32"
Row 3: 87 sts
Row 7: 85 sts
Row 11: 83 sts
Row 15: 81 sts
Row 19: 79 sts
Size 36"
Row 3: 95 sts
Row 7: 93 sts
Row 11: 91 sts
Row 15: 89 sts
Row 19: 87 sts
Row 23: 85 sts
Row 25: 83 sts
Size 40"
Row 3: 103 sts
Row 7: 101 sts
Row 11: 99 sts
Row 15: 97 sts
Row 19: 95 sts
Row 23: 93 sts
Row 25: 91 sts
Row 27: 89 sts
Size 44"
Row 3: 117 sts
Row 7: 115 sts
Row 11: 113 sts
Row 13: 111 sts
Row 15: 109 sts
Row 17: 107 sts
Row 19: 105 sts
Row 21: 103 sts
Row 23: 101 sts
Row 25: 99 sts
Row 27: 97 sts
Size 48"
Row 3: 123 sts
Row 7: 121 sts
Row 11: 119 sts
Row 13: 117 sts
Row 15: 115 sts
Row 17: 113 sts
Row 19: 111 sts
Row 21: 109 sts
Row 23: 107 sts
Row 25: 105 sts
Row 27: 103 sts
Size 52"
Row 3: 133 sts
Row 5: 131 sts
Row 7: 129 sts
Row 9: 127 sts
Row 11: 125 sts
Row 13: 123 sts
Row 15: 121 sts
Row 17: 119 sts
Row 19: 117 sts
Row 21: 115 sts
Row 23: 113 sts
Row 25: 111 sts
Row 27: 109 sts
Size 56"
Row 3: 141 sts
Row 5: 139 sts
Row 7: 137 sts
Row 9: 135 sts
Row 11: 133 sts
Row 13: 131 sts
Row 15: 129 sts
Row 17: 127 sts
Row 19: 125 sts
Row 21: 123 sts
Row 23: 121 sts
Row 25: 119 sts
Row 27: 117 sts
Row 29: 115 sts
Size 60"
Row 3: 151 sts
Row 5: 149 sts
Row 7: 147 sts
Row 9: 145 sts
Row 11: 143 sts
Row 13: 141 sts
Row 15: 139 sts
Row 17: 137 sts
Row 19: 135 sts
Row 21: 133 sts
Row 23: 131 sts
Row 25: 129 sts
Row 27: 127 sts
Row 29: 125 sts
Row 31: 123 sts
Size 64"
Row 3: 161 sts
Row 5: 159 sts
Row 7: 157 sts
Row 9: 155 sts
Row 11: 153 sts
Row 13: 151 sts
Row 15: 149 sts
Row 17: 147 sts
Row 19: 145 sts
Row 21: 143 sts
Row 23: 141 sts
Row 25: 139 sts
Row 27: 137 sts
Row 29: 135 sts
Row 31: 133 sts
Row 33: 131 sts
Size 68"
Row 3: 171 sts
Row 5: 169 sts
Row 7: 167 sts
Row 9: 165 sts
Row 11: 163 sts
Row 13: 161 sts
Row 15: 159 sts
Row 17: 157 sts
Row 19: 155 sts
Row 21: 153 sts
Row 23: 151 sts
Row 25: 149 sts
Row 27: 147 sts
Row 29: 145 sts
Row 31: 143 sts
Row 33: 141 sts
Row 35: 139 sts
At this point, you should have:
Total rows from start of armhole: 50 (54, 58, 60, 62, 66) [68, 74, 78, 82] rows (including BO rows).
Length from armhole BO: approx. 7 (7.5, 8.25, 8.25, 9, 9.25) [9.75, 10.5, 11.25, 11.5] inches / 17.5 (19, 20.5, 20.5, 22.5, 23) [24.5, 26.5, 28, 29] cm.
Remaining Stitches: 79 (83, 89, 97, 103, 109) [115, 121, 133, 139] sts.
Cut the yarn and place all stitches on a holder.


Finishing
Blocking: Gently block the front and back panels to the finished measurements.
Side Seams: With the right sides facing up, join the side seams using the mattress stitch.
Shoulder Seams: Join the shoulder seams using the three-needle bind-off.
Back Neckline: Bind off the remaining stitches at the middle of the back neckline using a standard bind-off.
SLEEVES
Sleeve Cap Shaping
Pick Up Stitches: With the right side facing, pick up and knit 72 (78, 88, 94, 104, 114) [124, 132, 140, 148] sts evenly around the armhole. To maintain symmetry, pick up approximately 36 (39, 44, 47, 52, 57) [62, 66, 70, 74] sts on the front and back halves of the armhole. Begin and end at the underarm.
Place Markers (PM): Place markers as you work the first round, or after completion, as follows:
m1 after 6 (8, 10, 11, 12, 13) [15, 16, 17, 18] sts
m2 after 30 (32, 36, 38, 42, 44) [47, 50, 53, 56] sts
m3 after 42 (46, 52, 56, 62, 70) [77, 82, 87, 92] sts
m4 after 66 (70, 78, 83, 92, 101) [109, 116, 123, 130] sts
BOR after 72 (78, 88, 94, 104, 114) [124, 132, 140, 148] sts
Work Short Rows
Setup Row 1 (RS): Knit to m3. Remove m3, wrap the next stitch (w&t), purl back to m2. Remove m2, wrap the next stitch (w&t).
Setup Row 2 (WS): You will now have two new markers placed after the wrapped stitches from the previous row.
Short Row Sequence:
On RS rows, knit to the marker before the wrapped stitch, remove the marker, w&t.
On WS rows, purl to the marker before the wrapped stitch, remove the marker, w&t.
After each turn, place a new marker after the newly wrapped stitch.
Continue this sequence. Markers m2 and m3 will move one stitch inward with each turn, gradually moving toward m1 and m4, respectively.
Continue until the turning point is one stitch before m1 and m4. Wrap the stitches just before these markers.
Work the sleeve in the round, following the "Sleeve Decreases" table for shaping.
Decrease Round: K2, k2tog, knit to last 4 sts, ssk, k2. (2 stitches decreased)
Continue working as set until all decrease rounds are complete.
Sleeve Decreases
Work the decreases as specified for your size.
Size 32"
Rnd 8: 70 sts
Rnd 16: 68 sts
Rnd 24: 66 sts
Rnd 32: 64 sts
Rnd 40: 62 sts
Rnd 48: 60 sts
Size 36"
Rnd 6: 76 sts
Rnd 12: 74 sts
Rnd 18: 72 sts
Rnd 24: 70 sts
Rnd 31: 68 sts
Rnd 38: 66 sts
Rnd 45: 64 sts
Rnd 52: 62 sts
Size 40"
Rnd 5: 86 sts
Rnd 10: 84 sts
Rnd 15: 82 sts
Rnd 20: 80 sts
Rnd 25: 78 sts
Rnd 30: 76 sts
Rnd 35: 74 sts
Rnd 40: 72 sts
Rnd 45: 70 sts
Rnd 50: 68 sts
Rnd 56: 66 sts
Size 44"
Rnd 4: 92 sts
Rnd 8: 90 sts
Rnd 12: 88 sts
Rnd 16: 86 sts
Rnd 20: 84 sts
Rnd 25: 82 sts
Rnd 30: 80 sts
Rnd 35: 78 sts
Rnd 40: 76 sts
Rnd 45: 74 sts
Rnd 50: 72 sts
Rnd 55: 70 sts
Rnd 60: 68 sts
Size 48"
Rnd 3: 102 sts
Rnd 6: 100 sts
Rnd 9: 98 sts
Rnd 12: 96 sts
Rnd 15: 94 sts
Rnd 18: 92 sts
Rnd 21: 90 sts
Rnd 24: 88 sts
Rnd 28: 86 sts
Rnd 32: 84 sts
Rnd 36: 82 sts
Rnd 40: 80 sts
Rnd 44: 78 sts
Rnd 48: 76 sts
Rnd 52: 74 sts
Rnd 56: 72 sts
Rnd 60: 70 sts
Size 52"
Rnd 3: 112 sts
Rnd 6: 110 sts
Rnd 9: 108 sts
Rnd 12: 106 sts
Rnd 15: 104 sts
Rnd 18: 102 sts
Rnd 21: 100 sts
Rnd 24: 98 sts
Rnd 27: 96 sts
Rnd 30: 94 sts
Rnd 33: 92 sts
Rnd 36: 90 sts
Rnd 40: 88 sts
Rnd 44: 86 sts
Rnd 48: 84 sts
Rnd 52: 82 sts
Rnd 56: 80 sts
Rnd 60: 78 sts
Size 56"
Rnd 3: 122 sts
Rnd 6: 120 sts
Rnd 9: 118 sts
Rnd 12: 116 sts
Rnd 15: 114 sts
Rnd 18: 112 sts
Rnd 21: 110 sts
Rnd 24: 108 sts
Rnd 27: 106 sts
Rnd 30: 104 sts
Rnd 33: 102 sts
Rnd 36: 100 sts
Rnd 39: 98 sts
Rnd 42: 96 sts
Rnd 45: 94 sts
Rnd 48: 92 sts
Rnd 52: 90 sts
Rnd 56: 88 sts
Rnd 60: 86 sts
Size 60"
Rnd 3: 130 sts
Rnd 6: 128 sts
Rnd 9: 126 sts
Rnd 12: 124 sts
Rnd 15: 122 sts
Rnd 18: 120 sts
Rnd 21: 118 sts
Rnd 24: 116 sts
Rnd 27: 114 sts
Rnd 30: 112 sts
Rnd 33: 110 sts
Rnd 36: 108 sts
Rnd 39: 106 sts
Rnd 42: 104 sts
Rnd 45: 102 sts
Rnd 48: 100 sts
Rnd 51: 98 sts
Rnd 54: 96 sts
Rnd 57: 94 sts
Rnd 60: 92 sts
Size 64"
Rnd 2: 138 sts
Rnd 4: 136 sts
Rnd 6: 134 sts
Rnd 9: 132 sts
Rnd 12: 130 sts
Rnd 15: 128 sts
Rnd 18: 126 sts
Rnd 21: 124 sts
Rnd 24: 122 sts
Rnd 27: 120 sts
Rnd 30: 118 sts
Rnd 33: 116 sts
Rnd 36: 114 sts
Rnd 39: 112 sts
Rnd 42: 110 sts
Rnd 45: 108 sts
Rnd 48: 106 sts
Rnd 51: 104 sts
Rnd 54: 102 sts
Rnd 57: 100 sts
Rnd 60: 98 sts
Size 68"
Rnd 2: 146 sts
Rnd 4: 144 sts
Rnd 6: 142 sts
Rnd 8: 140 sts
Rnd 10: 138 sts
Rnd 12: 136 sts
Rnd 15: 134 sts
Rnd 18: 132 sts
Rnd 21: 130 sts
Rnd 24: 128 sts
Rnd 27: 126 sts
Rnd 30: 124 sts
Rnd 33: 122 sts
Rnd 36: 120 sts
Rnd 39: 118 sts
Rnd 42: 116 sts
Rnd 45: 114 sts
Rnd 48: 112 sts
Rnd 51: 110 sts
Rnd 54: 108 sts
Rnd 57: 106 sts
Rnd 60: 104 sts
Sleeve Length: Work even until the sleeve measures 7 (7.5, 8, 8.5, 8.5, 8.5) [8.5, 8.5, 8.5, 8.5] inches / 17.5 (19, 20, 21.5, 21.5, 21.5) [21.5, 21.5, 21.5, 21.5] cm from the underarm.
Cuff: Work in garter stitch in the round (knit 1 round, purl 1 round) for 1 inch / 2.5 cm, ending after a purl round. Bind off all stitches loosely. The I-Cord Bind-Off is recommended for a clean finish.
Repeat all steps for the second sleeve.
HEM & BANDS
Bottom Hem: Pick up stitches at a 4:5 ratio along the lower edge of the cardigan body. Work in garter stitch (knit 1 row, purl 1 row) for 2 inches / 5 cm. Bind off loosely.
Front Bands & Collar: Starting at the lower right front edge, pick up stitches at a 4:5 ratio along the right front, around the back neck, and down the left front. Work in garter stitch for 1.5 inches / 3.75 cm. Bind off loosely. The I-Cord Bind-Off works well here for a polished edge.
FINAL FINISHING
Gently block the entire garment to smooth the stitches and achieve the final measurements. Weave in all remaining ends.
Stitch Patterns & Charts
LEFT KORU (13 STS)
Row 1 (RS): (P1, k tbl) x 3, k2tog, (p1, k tbl) x 2, yo, p1.
Row 2 (WS): K1, p1, (p tbl, k1) x 2, p tbl x 2, (k1, p tbl) x 2, k1.
Row 3: (P1, k tbl) x 2, p1, k2tog, (p1, k tbl) x 2, yo, k tbl, p1.
Row 4: (K1, p tbl) x 6, k1.
Row 5: (P1, k tbl) x 2, k2tog, (p1, k tbl) x 2, yo, p1, k tbl, p1.
Row 6: K1, p tbl, k1, p1, (p tbl, k1) x 2, p tbl x 2, k1, p tbl, k1.
Row 7: P1, k tbl, p1, k2tog, (p1, k tbl) x 2, yo, (k tbl, p1) x 2.
Row 8: Repeat row 4.
Row 9: P1, k tbl, k2tog, (p1, k tbl) x 2, yo, (p1, k tbl) x 2, p1.
Row 10: (K1, p tbl) x 2, k1, p1, (p tbl, k1) x 2, p tbl x 2, k1.
Row 11: P1, k2tog, (p1, k tbl) x 2, yo, (k tbl, p1) x 3.
Row 12: Repeat row 4.
RIGHT KORU (13 STS)
Row 1 (RS): P1, yo, (k tbl, p1) x 2, ssk, (k tbl, p1) x 3.
Row 2 (WS): (K1, p tbl) x 2, k1, p tbl x 2, (k1, p tbl) x 2, p1, k1.
Row 3: P1, k tbl, yo, (k tbl, p1) x 2, ssk, (p1, k tbl) x 2, p1.
Row 4: (K1, p tbl) x 6, k1.
Row 5: P1, k tbl, p1, yo, (k tbl, p1) x 2, ssk, (k tbl, p1) x 2.
Row 6: K1, p tbl, k1, p tbl x 2, (k1, p tbl) x 2, p1, k1, p tbl, k1.
Row 7: (P1, k tbl) x 2, yo, (k tbl, p1) x 2, ssk, p1, k tbl, p1.
Row 8: Repeat row 4.
Row 9: (P1, k tbl) x 2, p1, yo, (k tbl, p1) x 2, ssk, k tbl, p1.
Row 10: K1, p tbl x 2, (k1, p tbl) x 2, p1, (k1, p tbl) x 2, k1.
Row 11: (P1, k tbl) x 3, yo, (k tbl, p1) x 2, ssk, p1.
Row 12: Repeat row 4.
BACK KORU
Row 1 (RS): (K tbl, p1) x 2, k tbl, k2tog, (p1, k tbl) x 2, yo, p1, yo, (k tbl, p1) x 2, ssk, (k tbl, p1) x 2, k tbl. (23 sts)
Row 2 (WS): (P tbl, k1) x 2, p tbl x 2, (k1, p tbl) x 2, p1, k1, p1, (p tbl, k1) x 2, p tbl x 2, (k1, p tbl) x 2.
Row 3: (K tbl, p1) x 2, k2tog, p1, (k tbl, p1, k tbl, yo) x 2, (k tbl, p1) x 2, ssk, (p1, k tbl) x 2.
Row 4: (P tbl, k1) x 11, p tbl.
Row 5: K tbl, p1, k tbl, k2tog, (p1, k tbl) x 2, yo, (p1, k tbl) x 2, p1, yo, (k tbl, p1) x 2, ssk, k tbl, p1, k tbl.
Row 6: P tbl, k1, p tbl x 2, (k1, p tbl) x 2, p1, (k1, p tbl) x 2, k1, p1, (p tbl, k1) x 2, p tbl x 2, k1, p tbl.
Row 7: K tbl, p1, k2tog, (p1,k tbl) x 2, yo, (k tbl, p1) x 3, k tbl, yo, (k tbl, p1) x 2, ssk, p1, k tbl.
Row 8: Repeat row 4.
Row 9: K tbl, k2tog, (p1, k tbl) x 2, yo, (p1, k tbl) x 4, p1, yo, (k tbl, p1) x 2, ssk, k tbl.
Row 10: P tbl x 2, (k1, p tbl) x 2, p1, (k1, p tbl) x 4, k1, p1, (p tbl, k1) x 2, p tbl x 2.
Row 11: K2tog, (p1, k tbl) x 2, yo, (k tbl, p1) x 5, k tbl, yo, (k tbl, p1) x 2, ssk.
Row 12: Repeat row 4.
BACK TWISTS
Row 1 (RS): P1, k tbl, p2, k tbl, p1. (6sts)
Row 2 (WS): K1, p tbl, k2, p tbl, k1.
Row 3: P1, 1/1 LPT, 1/1 RPT, p1.
Row 4: K2, p tbl x 2, k2.
Row 5: P2, 1/1 LT, p2.
Row 6: Repeat row 4.
Row 7: P1, 1/1 RPT, 1/1 LPT, p1.
Row 8: K1, p tbl, k2, p tbl, k1.


Tutorials & Techniques
Three-Needle Bind-Off
This technique joins live stitches while creating a sturdy, decorative seam on the inside.
Place the shoulder stitches from the front and back onto two separate needles.
Hold the needles together with the right sides of the fabric facing each other (the seam will form on the inside).
Using a third needle, knit the first stitch from the front needle together with the first stitch from the back needle.
*Knit the next pair of stitches together in the same way. You now have two stitches on your right needle.
Pass the first stitch over the second to bind off one stitch.*
Repeat from * to * across the row until one stitch remains.
Cut the yarn and pull the tail through the final stitch to secure.
Mattress Stitch
This invisible seam is ideal for joining the side seams of your cardigan.
Lay the pieces flat with the right sides facing up.
Thread a darning needle with a long tail of yarn.
Identify the "bars" of fabric between the first and second stitches in from the edge.
Insert the needle under the first bar on one piece, then under the corresponding bar on the opposite piece.
Continue weaving the needle back and forth, picking up a new bar every 2-3 rows.
After every few inches, gently pull the yarn to close the seam. Avoid pulling too tightly to prevent puckering.
Picking Up and Knitting Stitches
This is used for the sleeves and bands to create a seamless look.
With the right side facing you, insert your needle tip under both legs of the edge stitch.
Wrap the yarn around the needle as if to knit.
Pull this loop through to the right side, creating a new stitch on your needle.
I-Cord Bind-Off
This method creates a rounded, finished edge that resembles a tiny cord.
Cast on 3 stitches using the knitted cast-on.
*Knit 2, then knit the next 2 stitches together through the back loops (this combines one i-cord stitch with one cardigan stitch to bind off).*
Slip the 3 stitches from the right needle back to the left needle.
Repeat from * until all cardigan stitches are bound off.
To finish, knit the remaining 3 i-cord stitches together (k3tog) and pull the yarn tail through the final stitch.